
Burglar alarm with Netduino Plus
IoT is becoming more popular these days. There are plenty of powerful microcontrollers on the market that don't require you to be C, ASM or Electronics guru to make some pretty cool stuff. You can create Embedded Systems even in .NET.
Two months ago I received my Netduino Plus board from sparkfun and implemented a somewhat useful project. I called it Secure Room. It consists of two basic parts: Netduino Plus board and PIR Motion Sensor. There are many such sensors available on eBay for a reasonable price. You can chose any of those or you can order one from sparkfun.
The working algorithm is pretty straightforward. PIR Sensor detects any motion in the room and sends the interruption to Netduino Plus board (think of it as an event). Then on the board itself that interruptions get wrapped into a meaningful message and sent via LAN as E-mail messages to the recipient. It could be you, your friends or relatives or even a police department. Also you can send those messages as SMS using E-mail to SMS gateway. Fortunately my phone provider has this feature.
Connecting Netduino Plus board to the Internet
First thing you should do is to configure your IP address for Netduino Plus. Assuming you have a router that implements Dynamic Host Configuration Protocol (DHCP). Sometimes a modem also has a built-in router. DHCP it's just a thing that allows Netduino Plus to get an IP address in your network automatically. In modern world every router supports DHCP.
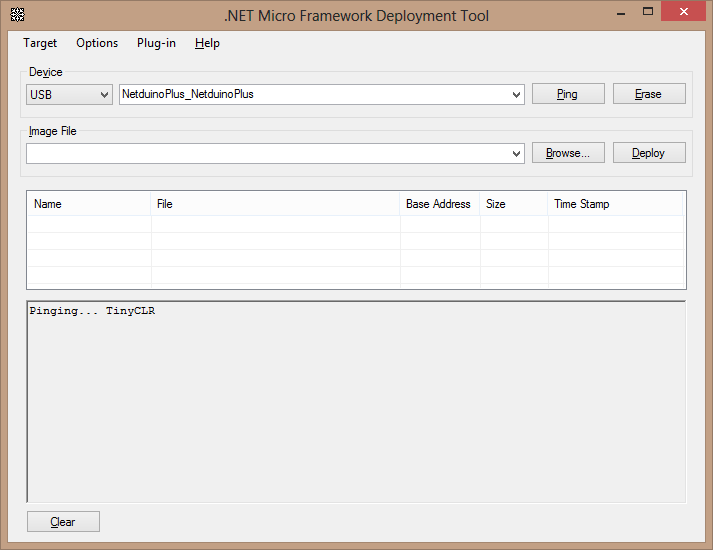
Anyway to configure Netduino Plus use MFDeploy tool. You can find it by looking in the directory: C:\Program Files (x86)\Microsoft .NET Micro Framework\v4.1\Tools\MFDeploy.exe on 64 bit operating system or you can use Start Menu shortcuts. Connect your device to your PC via USB cable, run MFDeploy tool, chose USB connection and click Ping button to make sure the device responds. You should see Pinging... TinyCLR message if everything is OK. If you don't see this message make try to reconnect device in the same or in the other USB port (yes, sometimes it is that simple).
In the Target menu select Configuration -> Network. The Network Configuration dialog box opens. Enter your Netduino plus MAC address there (the MAC address printed on the sticker at the bottom of the board). Sometimes MAC address gets entered automatically. Ignore other fields if you have DHCP router. And click Update.
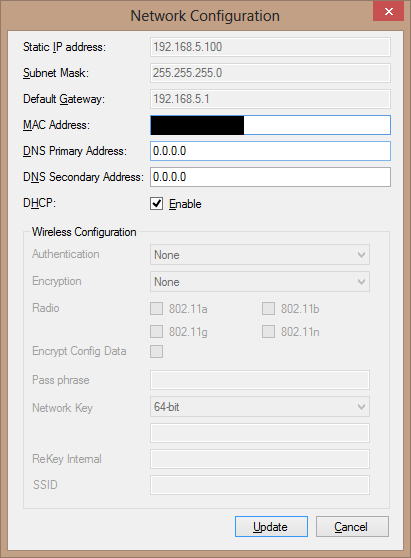
Make sure you have added Netduino MAC address to your router MAC filters table if you do such thing for security reasons. You should.
Connecting PIR Motion Sensor
As I mentioned before any sensor would work. Here I just show you a board layout because many people (especially those who came from .NET world like me) have troubles with the wiring. PIR sensor has three pins: one for voltage supply, one for actual detection and the ground pin.
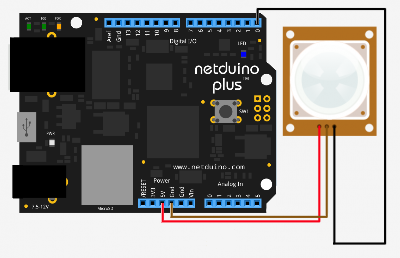
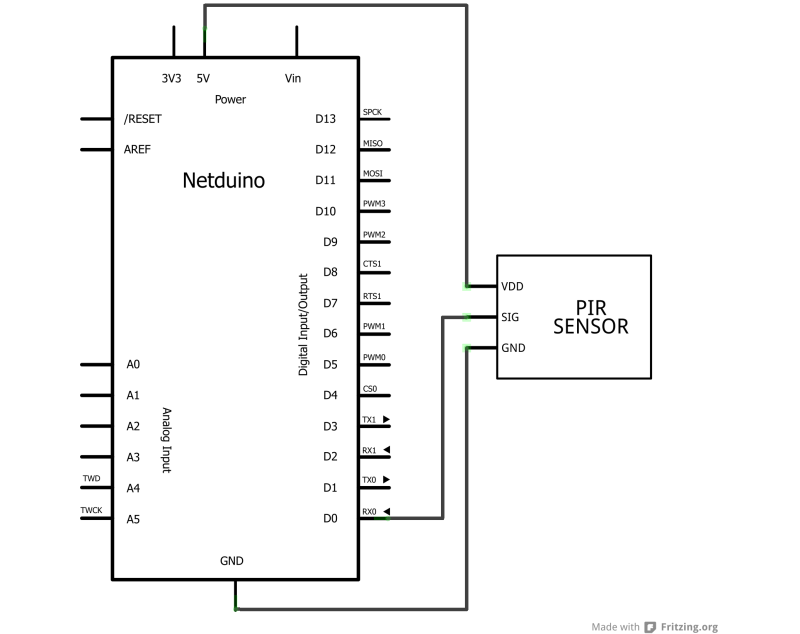
Connect your voltage supply to a 5V pin on Netduino Plus board, signal pin could be connected to any digital pin (I use D0 here). The ground PIR sensor lead should be connected to (surprise, surprise!) ground pin on the board. For people how read the schematics better I also show layout in that format below. I used Fritzing CAD software for both layouts.
We are all done with the wiring. Now lets move on to the C# code.
Programming part
Unfortunately .NET Micro Framework does not have an SmtpClient class for sending emails so I decided to use a third party library called Bansky.SPOT.Mail written by Pavel Bansky. You can download it on his website and use in your projects. This library is designed to be similar to official .NET Framework SmtpClient class, so it is very easy to work with.
Besides E-mail sending stuff we have to work with PIR motion sensor as well. I think it is a good practice to make a sensor wrapper class.
public delegate void PirTriggeredEventHandler(bool triggered, DateTime time);

public class PirSensor
{
    private InterruptPort sensor;

    public event PirTriggeredEventHandler SensorTriggered;

    public PirSensor(Cpu.Pin pinNumber)
    {
        sensor =
            new InterruptPort(
                pinNumber,
                false,
                Port.ResistorMode.PullUp,
                Port.InterruptMode.InterruptEdgeBoth);

            sensor.OnInterrupt +=
                new NativeEventHandler(
                    (data1, data2, time) =>
                    {
                        OnSensorTriggered(data1, data2, time);
                    }
            );

    }

    private void OnSensorTriggered(uint data1, uint data2, DateTime time)
    {
        var evt = SensorTriggered;
        if (evt != null)
            evt.Invoke(data2 == 1, time);

    }
}
The next thing we should do is implement the main method that should connect all the pieces together.
public class Program
{
    private static OutputPort onBoardLed = new OutputPort(Pins.ONBOARD_LED, false);
    public static void Main()
    {
        PirSensor pir = new PirSensor(Pins.GPIO_PIN_D0);
        pir.SensorTriggered += OnSensorTriggered;
        while (true)
        {
            Thread.Sleep(2000); // just waiting for pir interruptions forever
        }
    }
    static void OnSensorTriggered(bool triggered, DateTime time)
    {
        SendEmail();
    }
    public static void SendEmail()
    {
        onBoardLed.Write(true);
        MailMessage message = new MailMessage();
        message.From = new MailAddress("[email protected]", "Pavel Shchegolevatykh");
        message.To.Add(new MailAddress("[email protected]", "Pavel Shchegolevatykh"));
        message.Subject = "Dangerous activity";
        message.Body = "There are some dangerous activity in your secure room!";
        message.IsBodyHtml = false;
        SmtpClient smtp = new SmtpClient("smtp.yoursever.com", 25);
        try
        {
            smtp.Authenticate = true;
            smtp.Username = "yourname";
            smtp.Password = "yourpassword";
            smtp.Send(message);
        }
        catch (SmtpException e)
        {
            Debug.Print(e.Message);
            Debug.Print("Error Code: " + e.ErrorCode.ToString());
        }
        finally
        {
            smtp.Dispose();
        }
        onBoardLed.Write(false);
    }
}
In my implementation I use onboard LED to indicate when the object detected by the sensor (light ON) and when the e-mail message sent (light OFF). All the SMTP client exceptions are handled, so if a connection breaks or e-mail server stops working it doesn't crash the device code. It will keep sending e-mails.
Demo and Resources
I went one step further and implemented this using E-mail to SMS gateway via beemail (my phone provider-specific thing). So I can receive the messages even on my old Nokia 3310.
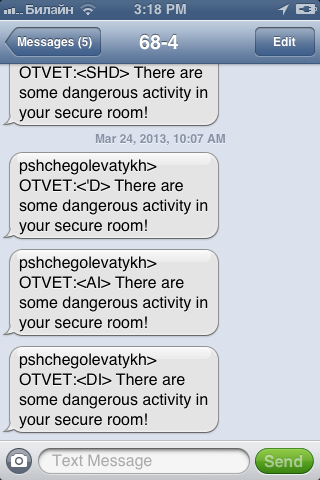
The picture above shows how message looks on my IPhone 3GS. Hope this was useful.
UPDATE1: I added a time delay between interruptions because PIR sended them too fast and too many. Interruption date and time was added to the message body. Date and time syncs with NTP server at device startup. Check out github code repo and see it for yourself.
UPDATE2: The project has become pretty robust. I've added a new piece of hardware called Seeed GSM Shield that would allow me to send SMS messages directly from the device if the Internet connection drops.
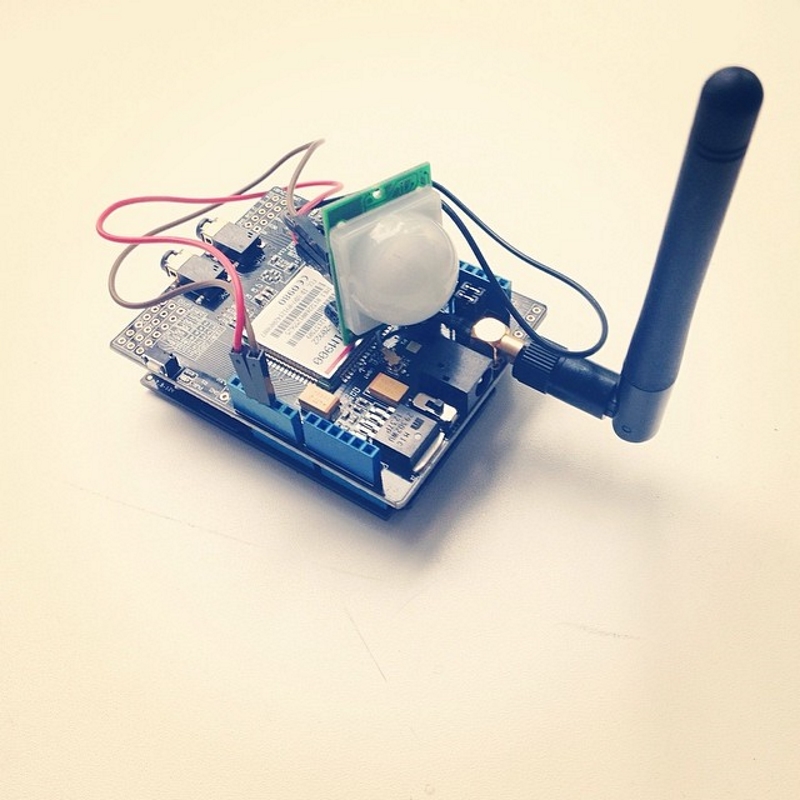
Also added a microSD card as a temp message storage. Basically the app tries to send messages on both GSM and LAN gateways. If something goes wrong with either of them the messages get stored on the microSD card to be sent later. The PIR reading interval was set to 60 seconds to avoid multiple interruptions overload.
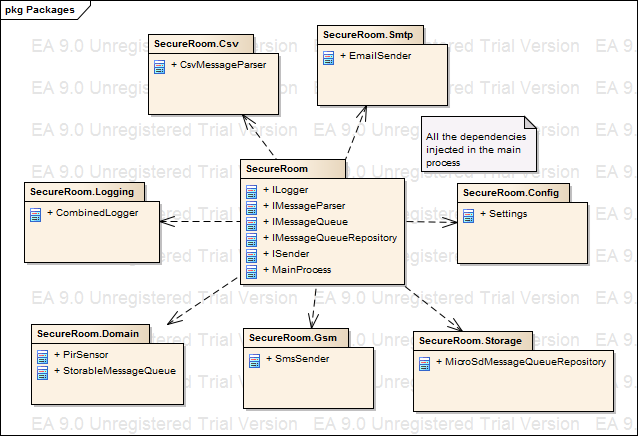
I showed only the basic package view of the system architecture to keep things simple. You can always take a look at the source code to see how things work under the hood. Feel free to leave some feedback.