
Getting started with Oracle XE in .NET
Quite often I had to work with database providers other than Microsoft SQL Server. Sometimes it could be tricky. Here I will show you some basic steps to start your development in .NET using Oracle Database XE as your data storage. The installation process is pretty straightforward. That's why I will not show here lots of pictures. You should basically press the Next button all the time. So I assume that my reader is a software developer. You can do extra research for each installation step if you need more information.
Step 1 - Download and Install Oracle Database XE
You can download and install Express product for free from official Oracle website. Current version is 11g. Chose the right plaform for your operating system (x64 or x86). The webpage asks you to accept the licence agreement and log in. If you don't have an account it is time to create it.
Then you should install downloaded package. During the process it is necessary to provide a password for DBA account. For this demo I used masterkey.
Step 2 - Download and Install Oracle SQL Developer (optional)
This step is not required, because you can use SQL console that comes with Oracle Database XE. Though I think that SQL Developer is a great tool and it's more user-friendly than a console. :) It has lots of features that I don't normally use like visual table creations, modeling, versioning and stuff. I just use its table/schema view and SQL Editor. It is very similar to SQL Management Studio from Microsoft in a way. You can download the archive from Oracle website. Installation does not required. You can just xcopy the archive contents to any folder. I copied this to Program Files.
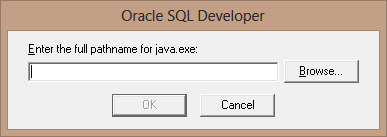
On the first run SQL Developer needs to know where to find java.exe. Just pointing to JRE file would not work because SQL Developer requires also JDK to be installed.
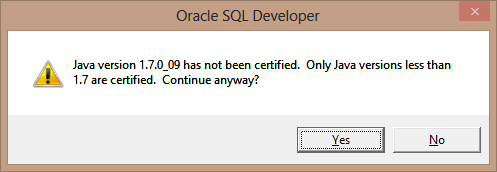
If you don't have a JDK installed you can also download it from same website. After that you specify the path explicitly. There also can be a warning about compatibility. Just skip it. Compatibility problems it's just a Java thing.
Now you are ready to create developer account for your database.
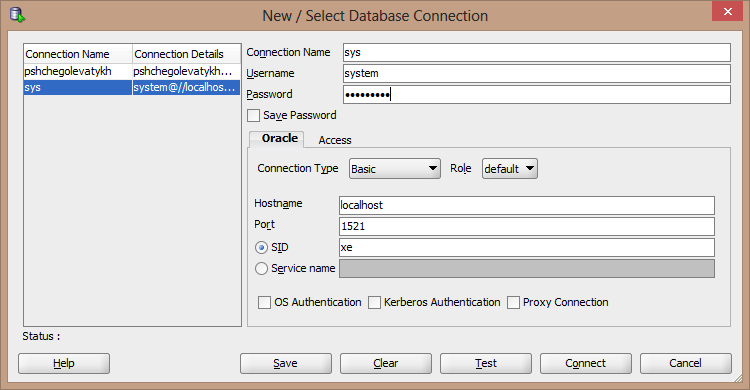
Step 3 - Create and Configure Developer Account
At first you have to connect to your database. Remember the DBA password you set during the installation?
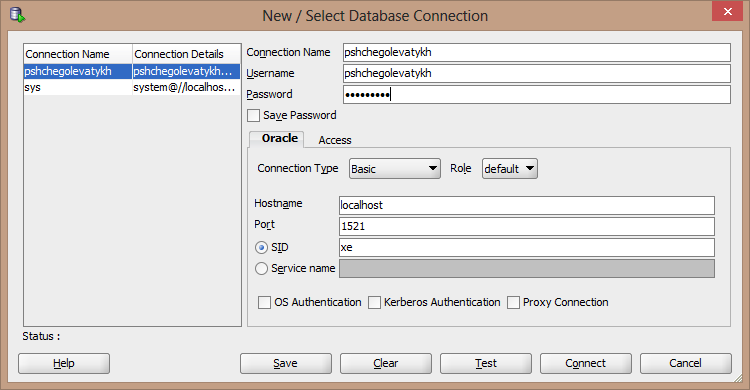
It's a good practice is to create a separate account for development purposes (developer is not a DBA right?) and give some permissions to this new account based on your security preferences. Here I'll' show an example of doing this. My "grants" are not so restrictive. :)
CREATE USER pshchegolevatykh IDENTIFIED BY masterkey;

GRANT CONNECT TO pshchegolevatykh;
GRANT UNLIMITED TABLESPACE TO pshchegolevatykh;

GRANT CREATE ANY TABLE  TO pshchegolevatykh;
GRANT CREATE ANY VIEW TO pshchegolevatykh;
GRANT CREATE ANY PROCEDURE TO pshchegolevatykh;
GRANT CREATE ANY SYNONYM TO pshchegolevatykh;
GRANT CREATE ANY INDEX TO pshchegolevatykh;
GRANT CREATE ANY TRIGGER TO pshchegolevatykh;
GRANT CREATE ANY SEQUENCE TO pshchegolevatykh;

GRANT ALTER ANY TABLE TO pshchegolevatykh;
GRANT ALTER ANY PROCEDURE TO pshchegolevatykh;
GRANT ALTER ANY INDEX TO pshchegolevatykh;
GRANT ALTER ANY TRIGGER TO pshchegolevatykh;
GRANT ALTER ANY SEQUENCE TO pshchegolevatykh;

GRANT DROP ANY TABLE TO pshchegolevatykh;
GRANT DROP ANY VIEW TO pshchegolevatykh;
GRANT DROP ANY PROCEDURE TO pshchegolevatykh;
GRANT DROP ANY SYNONYM TO pshchegolevatykh;
GRANT DROP ANY INDEX TO pshchegolevatykh;
GRANT DROP ANY TRIGGER TO pshchegolevatykh;
GRANT DROP ANY SEQUENCE TO pshchegolevatykh;
You can test this by creating new connection in SQL Developer.
Now I'm going to create a basic table for testing purposes.
CREATE TABLE PEOPLE
(
  "ID" NUMBER NOT NULL,
  FIRST_NAME VARCHAR2(50) NOT NULL,
  AGE NUMBER NOT NULL
);

ALTER TABLE PEOPLE
ADD CONSTRAINT PEOPLE_PK PRIMARY KEY("ID") ENABLE;

INSERT INTO PEOPLE ("ID", FIRST_NAME, AGE)
VALUES (1, 'John', 25);
INSERT INTO PEOPLE ("ID", FIRST_NAME, AGE)
VALUES (2, 'Bill', 36);
INSERT INTO PEOPLE ("ID", FIRST_NAME, AGE)
VALUES (3, 'Paul', 15);
Creation and insertion should work fine because we granted all the necessary permissions.
Step 4 - Download and Install Oracle Data Provider for .NET
Now it's time to download ODP.NET. Oracle has plenty of them. Chose the right version for your framework. The latest usually works fine. There are two options: get an archive that you can copy to the app folder or get a full fledged installer (with GAC and stuff). I prefer the second option because I find it simplier to be reused across all apps. The installation can take very long. I thought it was completely frozen at 99%, but then it went further, so just be patient.
Step 5 - Create a Console App to test your data access
ODP.NET should be integrated into Visual Studio if did the full installation. You can test if it works by creating a console app. Add reference to Oracle.DataAccess.dll and specify proper connection string. Here is the code example. I just put all the data access logic including connection string inside a Program class for simplicity. I know about separation of concerns and config files. So please don't tell me about that. :)
class Program
{
    private const string connectionString = "DATA SOURCE=(DESCRIPTION=(ADDRESS=(PROTOCOL=TCP)(HOST=localhost)(PORT=1521))(CONNECT_DATA=(SID=xe)));PASSWORD=masterkey;USER ID=pshchegolevatykh";

    static void Main(string[] args)
    {
        ModificationTest();
    }

    static void ModificationTest()
    {
        using (var connection = new OracleConnection(connectionString))
        {
            const string query = "INSERT INTO PEOPLE VALUES (11111, 'Test', 99)";

            connection.Open();

            using (var command = new OracleCommand(query, connection))
            {
                try
                {
                    command.ExecuteNonQuery();
                }
                catch (OracleException exception)
                {
                    Console.WriteLine(exception.Message);
                }
           }

           connection.Close();

       }

       Console.WriteLine("Modification Successful! {0}", DateTime.Now.ToLongTimeString());

   }
}
After running the app if you switch to Oracle Database and then select all rows from the PEOPLE table there should be a new record.
Hope this would save some of your time configuring Oracle XE Database for .NET apps.